Spin Bike Resistance Levels to Watts — What the Numbers Mean
Spin bike resistance levels have gotten complicated with all the conflicting charts and half-answers flying around. As someone who’s been coaching indoor cycling for eleven years — first at a boutique studio in Denver running Keiser M3i bikes, then at a larger gym that switched to Pelotons, and now working with athletes on a mix of equipment including generic magnetic trainers that cost $400 on Amazon — I learned everything there is to know about what those numbers on your display actually mean. Or don’t mean. The single most common question I hear from serious riders is some version of “what watts am I actually putting out?” And the honest answer — the one almost nobody publishes — is that your resistance level number tells you almost nothing without knowing the specific bike, the flywheel, the resistance mechanism, and your cadence at that exact moment.
Why There Is No Universal Chart
Frustrated by years of watching riders compare their “level 12” workouts like the number meant something consistent, I started digging into the actual engineering behind spin bike resistance systems. What I found surprised even me.
Resistance level 5 on a Peloton produces different watts than resistance level 5 on a Keiser M3i. Not the same. Not close. Not comparable in any meaningful training sense. This isn’t a calibration issue or a product defect — it’s just how the machines are built.
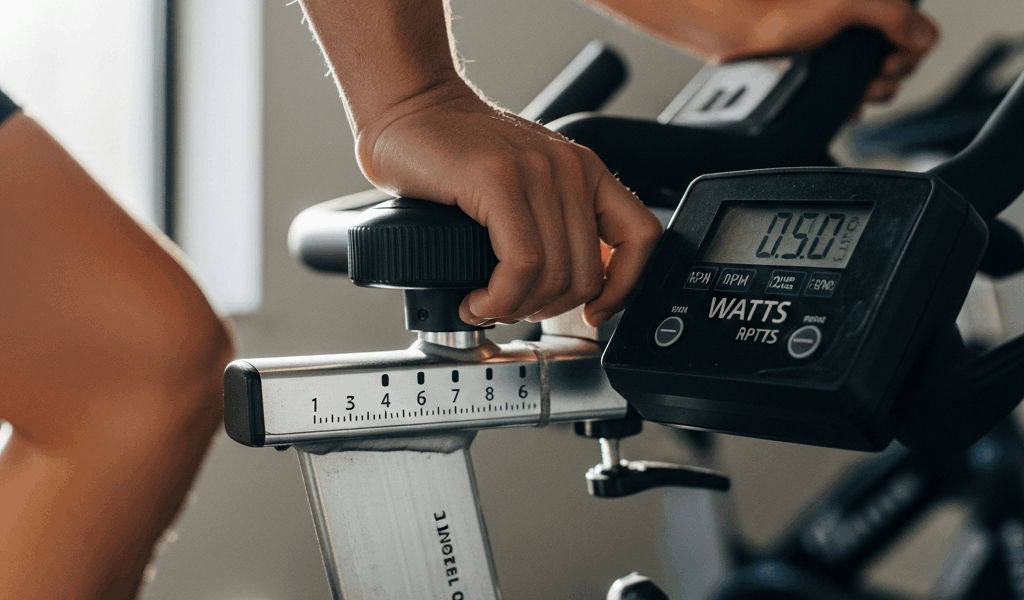
But what is a resistance level, exactly? In essence, it’s a numbered marker on a brand-specific drag scale. But it’s much more than that — or rather, much less universal than it appears. Under the hood, spin bikes use one of two main resistance mechanisms: friction-based (a felt or leather pad pressing against the flywheel) or magnetic (electromagnets creating drag without ever touching the flywheel). Keiser uses magnetic. Peloton uses magnetic. That $350 Sunny Health & Fitness bike from Amazon? Almost certainly friction. The drag curve for each system is completely different. Throw in flywheel weight — Keiser runs a lighter 8 lb flywheel compared to Peloton’s heavier setup — and the number on the resistance dial becomes even more arbitrary.
The scale itself is totally different from brand to brand. Peloton gives you 100 resistance levels. Keiser gives you 24. A generic 8-level friction bike gives you 8. These aren’t three versions of the same measurement. They’re three different manufacturers independently deciding how to carve up their particular drag range into numbered increments for display purposes — nothing more.
Probably should have opened with this section, honestly — because everything else here only makes sense once you accept that the number on your display is a relative indicator on that specific bike, not an objective power measurement.
There’s also calibration drift to consider. Friction-based bikes wear down their brake pads over time. A “level 8” in January on a heavily-used studio bike is not the same “level 8” in July. Magnetic bikes are more consistent but still vary unit to unit — especially cheaper models where magnet positioning tolerances are loose. Studios running 30+ classes a week on the same bikes without ever calibrating them are essentially giving their riders a moving target. Don’t make my mistake of assuming otherwise for the first few years I coached.
Approximate Watts by Resistance for Major Bikes
With all those caveats firmly in place, here are the approximate wattage ranges for the most common bikes. These figures assume a cadence of roughly 80 RPM — a typical steady-state effort. I’ll explain why cadence changes everything in the next section.
Peloton Bike and Bike+
Peloton’s 100-level system runs from about 50 watts at the low end (levels 1–20 at 80 RPM) up to roughly 400 watts at the upper extreme (levels 80–100 at 80 RPM) for most riders. The sweet spot for endurance work — what Peloton instructors call “flat road” — is typically levels 30–50, corresponding to roughly 100–175 watts at 80 RPM. A hard climb at level 65–75 usually lands in the 200–280W range. These figures align with the power zone training targets developed by coaches like Matt Wilpers, who has published some of the clearest FTP-based guidance for Peloton specifically.
Important note: Peloton’s output display shows a calculated wattage number directly — genuinely useful, that. Their proprietary algorithm translates resistance and cadence into a watt estimate. It’s not verified by an external power meter, and independent testers have found it can read 10–20% high or low compared to calibrated power meter pedals. But it’s at least internally consistent on a single bike, which matters more than people realize.
Keiser M3i
Keiser’s 24-level magnetic system has a steeper drag curve than Peloton. At levels 1–4 and 80 RPM you’re looking at 50–80W. By level 12 — the midpoint — you’re typically at 150–200W. Level 20 pushes into the 350W range, and the top levels, 22 through 24, can exceed 500W for strong riders. The M3i’s Bluetooth console actually reports watts in real time and has been independently validated as reasonably accurate — generally within 5–10% of a calibrated power meter. That’s one reason coaches running serious cycling programs tend to prefer Keiser over the alternatives.
Generic Magnetic Bikes (8–16 Levels)
This is the widest and most unpredictable category. A typical 8-level friction or magnetic bike — the kind you’d buy from NordicTrack’s lower tier, Sunny Health, Yesoul, or any number of Amazon white-label brands — compresses a wide resistance range into just a few clicks. Level 1 might be 40–60W at 80 RPM. Level 8 could be anywhere from 180W to 350W depending on the specific flywheel weight and magnet system. I once tested a $380 Merax spin bike against Assioma Duo power meter pedals and found the jump from level 5 to level 6 represented nearly 80 watts — a huge, lurching step that made structured interval training nearly impossible to calibrate.
Here’s a condensed reference table for quick comparison:
- Peloton (100 levels) at 80 RPM — Level 20: ~75W | Level 50: ~150W | Level 75: ~260W | Level 90: ~350W
- Keiser M3i (24 levels) at 80 RPM — Level 6: ~90W | Level 12: ~175W | Level 18: ~300W | Level 22: ~420W
- Generic 8-level magnetic at 80 RPM — Level 2: ~60W | Level 4: ~120W | Level 6: ~200W | Level 8: ~280–350W
Use these as rough orientation, not training targets. That’s the honest use case — and the only responsible one.
The RPM Variable
Here’s where a lot of riders get tripped up — and, I’ll admit, an earlier version of me did too. A resistance level chart without a cadence reference is genuinely misleading. I used to hand out printed charts showing “level 8 = moderate effort” without specifying RPM, and I cringe thinking about it now. I handed those out for two full years at that Denver studio.
The physics are straightforward. Power equals force multiplied by velocity. On a spin bike, resistance sets the force component — the drag on the flywheel — and cadence sets the velocity component, how fast you’re turning that drag. Change either one and your wattage changes, even if the resistance dial never moves.
A concrete example makes this real. Say you’re on a Keiser M3i at level 12.
- At 60 RPM — a slow, grinding climb — you’re producing roughly 130W
- At 80 RPM — a moderate pace — that same level 12 produces roughly 175W
- At 100 RPM — a fast spin — you’re now at roughly 220W
Same resistance. Nearly 100 watts of difference across the cadence range. That’s what makes cadence so endearing to us cycling coaches — it’s a lever most riders don’t even realize they’re pulling. An instructor can tell you to hold level 12 and “work harder” just by cueing you to pedal faster. They’re increasing your power output without touching the resistance knob.
It’s also why zone-based power training is so much more honest than resistance-level training. When I coach a rider to hold 180–200W for a 20-minute tempo block, they can get there at level 10 and 95 RPM or level 14 and 70 RPM — whatever matches their natural cadence and strength profile. Telling them “stay at level 12” ignores half the equation entirely.
The practical takeaway: any time you see a spin bike resistance-to-watts chart, check whether it specifies cadence. No cadence specified means the chart is presenting one reference point and implying it covers all conditions. It doesn’t.
How to Measure Your Own Bike
Motivated by wanting accurate data for my own athletes, I started testing power meter pedals on spin bikes about four years ago — specifically using a set of Assioma Duos I already owned for road cycling. The results were eye-opening and, once you understand what you’re doing, completely repeatable.
Power meter pedals — models like the Garmin Rally RS200, the Favero Assioma Duo, or the older discontinued PowerTap P1 — measure actual force through the pedal stroke and calculate true watts. They transmit via Bluetooth or ANT+ to a head unit, a phone app, or a smartwatch. Designed for road bikes, they thread into spin bike cranks using a standard 9/16″ pedal thread — which is what virtually every spin bike uses, conveniently enough.
First, you should confirm your spin bike uses that standard thread — at least if you want to avoid a frustrating trip back to the bike shop with the wrong pedals. Then here’s what the actual testing process looks like.
- Install the power meter pedals on the spin bike (takes about 2 minutes with a pedal wrench)
- Pair the pedals to a Wahoo ELEMNT Bolt, a Garmin Edge, or even the free Wahoo Fitness app on your phone
- Warm up for 5 minutes at a comfortable pace
- Set a target cadence — 80 RPM is a good standard — and hold it as steadily as possible using a metronome app
- Sit at each resistance level for 60 seconds, recording the average watt output
- Build your own chart for that specific bike
Cost is the obvious barrier. Garmin Rally RS200 pedals run about $500–$550. Favero Assioma Duo comes in around $400–$450 depending on where you buy them. PowerTap P1s are discontinued but available used on eBay for $150–$250 and still work reliably. The Assioma Duo might be the best option, as spin bike testing requires consistent Bluetooth connectivity — that is because cheaper power meter options sometimes drop signal mid-session when paired to a phone rather than a dedicated head unit. If you’re serious about training with power data, buying a set of pedals specifically to calibrate your spin bike is absolutely justified. One-time investment. Every future workout becomes quantifiable.
While you won’t need a full professional lab setup, you will need a handful of tools — the pedals themselves, a pedal wrench, a cadence-control method like a metronome app, and something to record your results. That’s genuinely it.
If that’s out of budget right now, the next best option is using your Peloton or Keiser M3i console watt output as a relative benchmark — imperfect but internally consistent — and building training zones around that number rather than a resistance level.
What Watts Actually Mean for Your Fitness
Getting an accurate watt number is only useful if you know what to do with it. Here are the practical fitness benchmarks I use with my riders, drawn from cycling coaching standards and years of watching real people at real fitness levels.
Beginner — 75 to 125 Watts
This is a sustainable aerobic effort for someone new to cycling or returning after a long break. A 45-minute class held mostly in this range is genuinely productive — you’re building aerobic base and teaching your legs the movement pattern. Don’t be embarrassed by this range. Every strong cyclist started here, apparently including several people I now coach at the competitive amateur level.
Intermediate — 125 to 200 Watts
This is where most regular gym-goers and recreational fitness cyclists operate during moderate-effort sessions. A well-conditioned non-cyclist who rides three times per week for a year typically lives in this range. Interval peaks might push to 230–250W. Sustained efforts at 150–175W for 20 minutes represent solid cardiovascular fitness — the kind that shows up in resting heart rate numbers and recovery times.
Advanced — 200 to 350 Watts
Sustaining 200+ watts for extended periods — 20 minutes or more — marks a genuine training adaptation. Competitive amateur cyclists, triathletes, and dedicated indoor cyclists who train with structure typically operate here. FTP scores of 200–300W are common in this group. It takes months of consistent work to get here. Possibly longer. Worth it.
Pro Cyclist Territory — 350 to 500 Watts and Beyond
Tour de France domestiques hold 350–400W for hours. Sprinters peak above 1,500W for a few seconds. These numbers exist as context — not intimidation. If you’re hitting 380W on your Keiser at level 22 for a 30-second sprint, you’re briefly touching the output of a trained competitive cyclist. That’s something worth knowing about yourself.
The number that matters most for your training isn’t your peak — it’s your functional threshold power, roughly the maximum watts you can sustain for one hour. Testing this on a spin bike using a standard 20-minute FTP protocol — then taking 95% of your average watts as your FTP estimate — gives you a real benchmark to build training zones around, regardless of which bike you’re on.
Resistance levels are a navigation tool for a specific bike on a specific day. Watts are a language every bike can eventually speak — some more accurately than others, but all pointing at the same underlying truth about how hard you’re actually working.


Leave a Reply