How to Tell If the Bottom Bracket Is Actually the Problem
Spin bike creaking has gotten complicated with all the conflicting advice flying around. Everyone jumps straight to the bottom bracket. I get it — it’s the obvious suspect. But after troubleshooting dozens of these bikes, I can tell you that the BB is guilty maybe half the time. The other half? Loose pedal. Wobbly crank arm. Complaining saddle. All of them produce sounds that feel like they’re radiating straight out of the center of the bike.
I once spent 45 minutes dismantling a perfectly fine bottom bracket because I didn’t check the pedals first. Don’t make my mistake.
Here’s the test that actually tells you something useful. Unclip both feet from the pedals and pedal hard — standing pressure, no hands on the bars. Listen. If the creak only shows up under load and feels unmistakably centered near the crank spindle, you’re probably in the right neighborhood. Coast for a few seconds. Creak disappears the moment you stop pedaling? That’s your confirmation.
That’s what makes bottom bracket failure recognizable to us home mechanics — it stays quiet under zero load because there’s no lateral pressure on the spindle. Physics, basically.
If the creak keeps going while you coast, or if it has that telltale metallic squeak of a pedal complaint, step away from the BB socket. Tighten your pedals first. Grab the crank arm and try wiggling it side to side — a loose crank arm fix takes literally 30 seconds. Bounce your weight on the saddle. A creaking saddle will absolutely give itself away.
Only move forward with BB work once the noise is clearly load-dependent, centered, and synced to the pedal stroke itself.
Tools You Need Before You Start
Probably should have opened with this section, honestly. Getting halfway through a repair only to realize you’re missing the one tool that makes it possible is a special kind of frustrating.
For most spin bikes, you’ll need:
- Crank puller (specialized tool, $12–25) or a quality hex wrench set sized to your crank bolt
- BB socket or pin spanner specific to your bottom bracket type — varies by brand, usually $8–18
- Bike grease — standard stuff works fine, no need for anything premium
- Torque wrench set to 50–70 Nm (optional, but honestly worth owning)
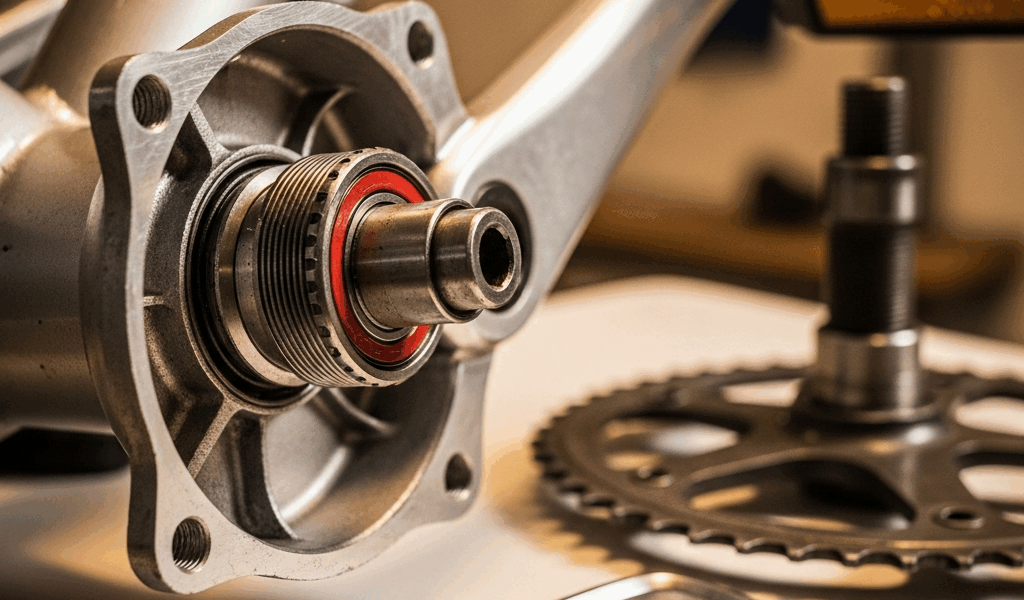
But what is a sealed cartridge bottom bracket? In essence, it’s a single self-contained unit — bearings, spindle, housing, all pre-assembled. But it’s much more than that in terms of what it means for your repair. Most home spin bikes — Peloton, Bowflex, NordicTrack, and the majority of budget models — use this type rather than a threaded cup system. That’s genuinely good news. You pull it out, clean the shell, grease it, reinstall. No cone wrench gymnastics. No fussy adjustments. Road cyclists deal with far more misery on this front.
Check your manual or look directly at the BB itself. Single cylindrical cartridge sliding straight out of the frame? Sealed cartridge. Threaded cups on both sides of the frame? Traditional threaded BB — still fixable, just slightly more involved.
Step-by-Step Fix for a Creaking Bottom Bracket
Start with the crank arms. Use your crank puller or hex key to remove the bolts holding each arm to the spindle — most spin bikes use two bolts per arm, typically 8mm or 10mm. Keep those bolts somewhere you’ll actually find them again.
Pull both crank arms straight outward and set them aside.
Now look at the BB shell. Spin it slowly. You’re checking for dirt, corrosion, visible damage. Light dust is normal. Heavy buildup or rust means cleaning time — 220 to 400 grit sandpaper removes surface oxidation without destroying the threads. Don’t go aggressive. Just clean.
Use your BB socket and wrench to remove the cartridge. Here’s where people confuse themselves: the drive-side cup — that’s the right side — uses reverse threading on many bikes. It unscrews clockwise, not counterclockwise. Test gently before committing to a full turn. The non-drive side follows standard threading.
Once the BB is out, inspect everything. Clean the shell bore or threads with a rag. Old grease, grit, corrosion — wipe it all out. A small amount of degreaser helps, though plain water works fine if you dry it completely afterward.
Apply fresh grease — thin, even coat — around the inner bore or threads. This is where the creaking actually stops. The grease fills micro-gaps between the cartridge and shell, kills the vibration pathway. Simple mechanism, surprisingly effective.
Slide the cartridge back in. Thread it by hand first — if it’s not smooth, stop and recheck the alignment. Then torque it to spec with your socket. For most spin bikes, that’s 50 to 70 Nm. Firm, not brutal. A properly seated BB rotates silently when you spin it by hand.
Reinstall both crank arms, torque the bolts to around 30–40 Nm, and test ride. A properly done BB repair eliminates the creak completely. First ride. No exceptions.
What If the Creak Comes Back After Fixing It
Returns within two or three rides? The bearings inside the cartridge have failed. Regreasing won’t save them — they’re worn through internally, and no amount of fresh grease changes that.
Most spin bikes use a Shimano UN26 or a comparable standard cartridge. They run $15–40 online. I’m apparently a Shimano person and the UN26 works for me while off-brand cartridges never seem to last past a few months. Replacement is identical to the process above.
If the returning noise sounds less like a creak and more like a grinding sensation, you may have stripped the shell threads. Threaded BBs can sometimes be rescued with slightly larger diameter cartridges or helicoil inserts — but that’s professional mechanic territory. Press-fit BBs with structural failure usually require a repair shop or, in worse cases, a frame replacement.
When to Replace the Bottom Bracket Entirely
Some signs are just final. Grinding or crunching that doesn’t respond to cleaning and regreasing. Visible lateral play — the spindle actually wobbles side to side under your hand. Rust so deep the bore is pitted rather than just discolored.
But what is a bottom bracket replacement, really? In essence, it’s a routine maintenance swap, not a repair. But it’s much more than that psychologically — people treat it like a catastrophe when it’s closer to replacing a chain. A new Shimano UN26 costs $18–30. Installation takes 20 minutes once you have the tools. Your bike isn’t broken. The BB wore out. That’s what wear items do.
So, without further ado — get the cartridge, run through the steps above, and get back to riding. Quietly, this time.


Leave a Reply