Why Your Spin Bike Seat Keeps Dropping
Spin bike seat problems have gotten complicated with all the bad advice flying around. Tighten the bolt, they say. So you tighten it. You ride. Twenty minutes later you’re hunched over adjusting again — at least if your experience mirrors mine. I spent three months chasing this exact problem before I figured out I was actually dealing with two completely different failure modes and treating them like one. That’s why nothing worked.
There are two main seat post designs out there, and they fail in opposite directions.
Friction posts use a round cylindrical rod with vertical knurling running the length — tiny ridges, almost like a corn cob texture. A collar clamp wraps around the post. Tighten the bolt, it squeezes inward, friction holds everything. Simple. Elegant. Fails in about four different ways nobody tells you about.
Rail-style seats mount differently. No round post — instead you get a metal rail or track system, and the saddle clamps directly onto it using a two-bolt or four-bolt plate. The failure mode here is almost always a cracked or wallowed-out clamp plate. The metal piece that grabs the rail just loses rigidity after enough use. That’s it. That’s the whole problem.
Most articles online treat both designs identically and tell you to tighten the bolt. That’s why you’re reading this right now.
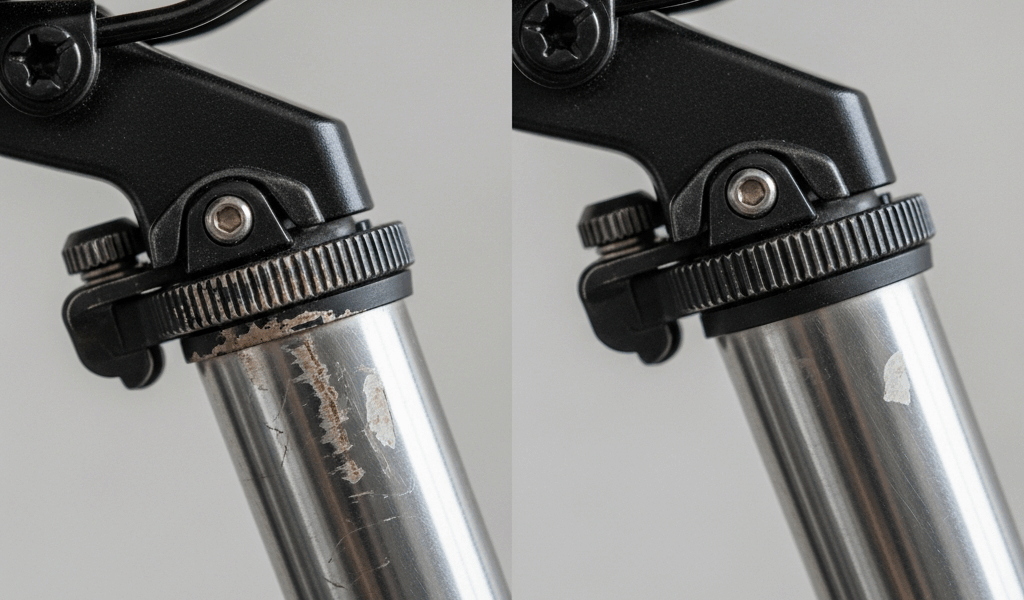
Here’s what actual failure looks like: a worn collar has a smooth, almost shiny inner diameter instead of knurling that matches the post. A cracked collar has a visible split — sometimes hairline, sometimes obvious. Stripped post knurling looks polished instead of textured. A diameter mismatch means the post wiggles side to side inside the collar because they’re simply not the same size. I figured this out after buying a $40 collar, installing it, and watching the seat drop again two weeks later. Don’t make my mistake.
Check These Things Before You Start
Probably should have opened with this section, honestly. Do a five-minute inspection before you touch any tools. This is the part I kept skipping.
- Look at the post knurling. Run your finger down the length of the post. Real knurling feels like rough sandpaper — textured, grippy. Worn knurling feels smooth and almost slippery. If it’s smooth, you’re looking at post replacement. Not a collar swap. Post replacement.
- Inspect the collar. Spin it slowly around the post. Look for hairline cracks, especially right at the bolt hole. A cracked collar won’t hold regardless of how hard you crank it — I learned this one the embarrassing way on a $60 Nashbar replacement.
- Check for wobble. Grab the seat and rock it side to side. Not up and down — side to side. Does the post shift independently inside the collar? That’s a diameter mismatch. Either the post is too thin for that collar, or someone installed a rail-style collar on a friction post.
- Clean the post. Wipe off every trace of sweat, grease, and dust with a dry cloth. Grease alone explains why a freshly tightened seat slides within an hour. It sounds obvious. People skip it constantly.
- Mark your position. Draw a line with a Sharpie from the seat tube directly onto the post. This tells you immediately whether slippage is actually happening or whether you’re just misremembering where you set it.
Fix 1 — Tighten or Replace the Seat Collar
Start here. Most people actually over-tighten, which creates the next failure instead of fixing the current one.
Tighten the collar bolt by hand until you feel genuine resistance. Then add exactly one quarter turn with a 4mm or 5mm Allen wrench — depending on your bike — and stop. That’s the whole move. Cheap aluminum collars crack under excessive torque. Once cracked, no amount of additional force helps. I see people crank collars “really tight” and then wonder why they’re buying another one three weeks later.
If the knurling looks intact and the collar isn’t cracked, the quarter-turn approach usually works. If the seat drops again after a single ride, the collar interior has worn smooth.
A worn collar has an inner diameter that’s become featureless from thousands of micro-movements over time. The post knurling can’t bite into polished metal. Replacement is the real fix. Match the inner diameter exactly — most spin bikes use either 25.4mm or 27.2mm posts, so measure before ordering anything. A replacement collar runs $12 to $35 depending on brand. Installation takes about ninety seconds.
Before buying a replacement, try this first: apply a thin layer of carbon assembly paste — also sold as friction compound — to the post knurling. This is the step almost nobody mentions. Shimano and Park Tool both make versions for around $8 a tube. The paste fills micro-gaps and restores grip on moderately worn posts. Clean everything completely first, apply a light coat, slide the collar on, tighten gently, let it cure thirty minutes before riding. Holds? You’ve bought time to source a proper replacement. Slides again? You’re replacing the post or collar.
Fix 2 — Dealing with a Worn or Smooth Post
If the post knurling is genuinely worn — polished-looking, almost glassy — no collar will grip it reliably. The friction just isn’t there anymore.
The temporary fix combines two things. First, the assembly paste from Fix 1. Second, a single wrap of PTFE plumber’s tape around the post. Wrap it once, overlap slightly, smooth it flat, then install the collar over it. PTFE tape costs about $3 at any hardware store and creates a micro-textured shim surface the collar can bite into. On a well-maintained bike, this holds for several months. Not permanent — but it works, and it buys time.
The permanent fix is post replacement. Most spin bikes use standard 25.4mm posts, though some commercial models — Schwinn IC4, some Keisers — run 27.2mm. Replacement posts run $25 to $80 depending on whether you’re just replacing the post or upgrading to a longer adjustable model. Remove the seat, pull the old post out, slide the new one in, tighten. Done in ten minutes.
Be honest about which path makes sense here. If the bike is five-plus years old, the post is original, and you’ve already swapped the collar twice, just replace the post. It’s cheaper than the frustration.
When to Stop Fixing and Replace the Part
There’s a hard stop. If the seat tube itself is cracked or bent, or the collar mount on the frame is damaged, you cannot fix this at home. Look for cracks radiating outward from the bolt holes, visible frame tube bending, or a clamp plate so wallowed out that bolts spin freely without catching anything.
Here’s the decision rule: if you’ve replaced the collar twice and the seat still drops within a week, either the post diameter is wrong for your frame or the frame itself is compromised. At that point you’re sourcing a new post assembly — under $100 for most bikes — or deciding whether replacement makes more sense. Quality spin bikes run $400 to $1,200 new, so the math usually favors parts. But if the frame is cracked, the bike is done. No amount of collar swapping changes that.

Leave a Reply