Spin Bike Seat Pain — How to Fix It and Ride Comfortably
Spin bike seat pain has gotten complicated with all the conflicting advice flying around. Padded shorts. Gel covers. Fancy saddle upgrades. Everyone’s selling something. I’ve been instructing indoor cycling for seven years now, and I learned everything there is to know about saddle discomfort — mostly the hard way. Today, I will share it all with you.
Here’s the thing nobody wants to hear: the seat probably isn’t your problem. Your setup is. Wrong height. Wrong angle. Wrong position. I can diagnose the issue within thirty seconds of watching someone ride. And fixing it costs exactly nothing.
Frustrated by persistent soreness after my first year teaching, I bought every padded solution on the market — three saddle covers, four brands of padded leggings, spent probably $200 total. Then a mentor asked me one question: “Where’s your seat positioned?” Turns out my saddle was sitting half an inch too high and tilted upward like a ski jump. No gel padding in the world fixes that. This new understanding took hold over the following months and eventually evolved into the setup system riders in my studio know and trust today.
The 3 Setup Mistakes That Cause 90% of Seat Pain
Probably should have opened with this section, honestly. Most discomfort traces back to three things: seat height, fore-aft position, and tilt. That’s it. That’s the whole list.
Height is usually the main culprit. A seat too high forces you to rock side to side with every pedal stroke — and that rocking creates friction in places that really don’t appreciate friction. Too low, and your sit bones compress into concentrated pressure points. Feels like sitting on a fence post. Your quads also fatigue faster because your legs never reach full extension, which makes you fidget and shift around constantly, which makes everything worse.
Fore-aft position determines whether your weight distributes across the whole saddle or piles onto the narrow nose. The knee-over-pedal test handles this one — more on that below. Tilt seems like a minor detail. We’re talking a few degrees. But it determines whether you’re actually perched on your sit bones or slowly sliding forward the entire class.
The good news: your bike already has everything you need to fix all three. So, without further ado, let’s dive in.
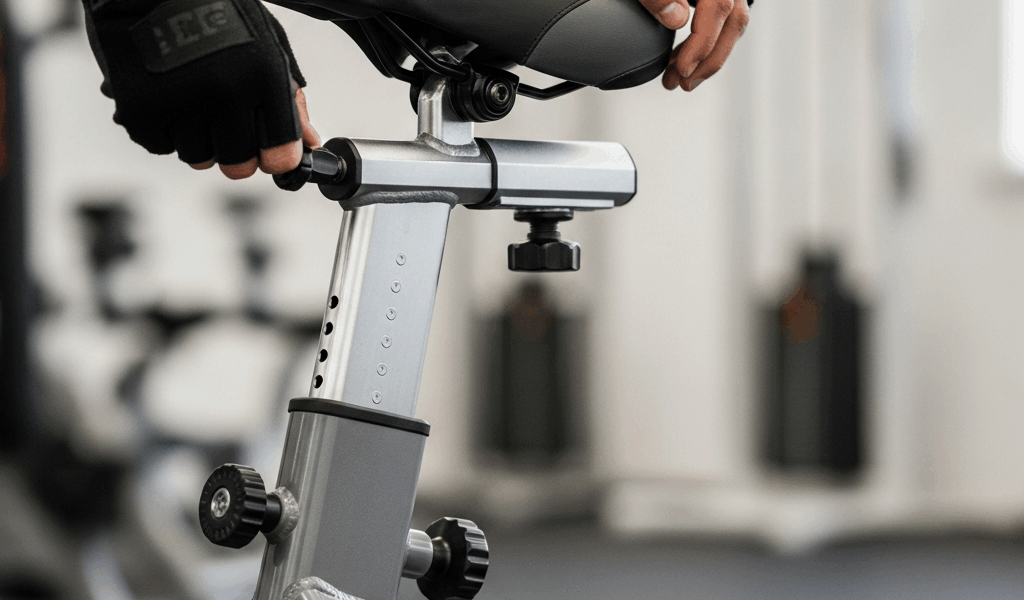
Saddle Height — The Most Common Fix
Frustrated by saddle soreness, most new riders crank the seat up or down based purely on feel, using whatever looks roughly right. This never works. You need an actual reference point.
Here’s the protocol I run in every beginner class. Clip into your pedals — or drop your foot into the cage if you’re not in cycling shoes. Bring your leg to the bottom of the pedal stroke. Your knee should hold a 25-35 degree bend. Not locked straight. Not folded up toward your chest. Somewhere in between, with a slight, visible angle remaining.
Without a protractor — and honestly, who brings a protractor to the gym — use your body as the guide. Sit upright and look down. Your shin should angle slightly forward. Nearly straight means the seat is too high. Knee crowding toward your chest means too low. Adjust in quarter-inch increments from there. On most Peloton bikes, NordicTrack bikes, and comparable models, proper height usually lands somewhere between 35-37 inches measured from the center of the crank spindle.
I’m apparently someone whose flexibility shifts with the seasons, and rechecking my height every four weeks works for me while ignoring it never does. Tighter hamstrings in winter push me toward a slightly lower position. More mobility in summer means I inch back up. The specific number matters less than the angle you’re achieving.
Don’t make my mistake. One client — Marcus — came in after three classes with knee pain he couldn’t explain. His seat was sitting two full inches too high. He’d matched it to the rider next to him during his first class, which felt logical at the time. Two inches doesn’t sound like much. His knees disagreed loudly. We dropped it to proper height and he never mentioned it again.
Fore-Aft Position and Tilt
But what is fore-aft position, exactly? In essence, it’s how far forward or backward your saddle sits relative to the pedals. But it’s much more than that — it determines your entire weight distribution and whether your sit bones actually land where they’re supposed to.
Here’s the test. Clip in with your pedal at three o’clock — parallel to the floor. Look straight down at your knee. It should align directly over the pedal spindle. Not over your toe. Your knee. This is the knee-over-pedal test, and it’s standard across every cycling discipline.
Knee ahead of the spindle? Slide the seat back. Knee trailing behind it? Move forward. Most riders start too far forward because it feels immediately comfortable. Your glutes enjoy a forward seat. Your sit bones absolutely do not — they end up bearing pressure on soft tissue instead of bone, which is exactly backwards.
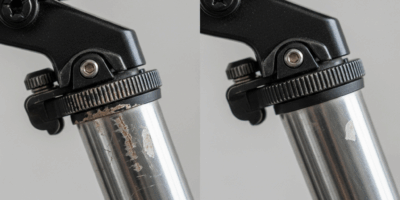
Tilt is its own conversation. Men typically ride level saddles — completely parallel to the floor. Women often benefit from a slight nose-down angle, maybe 5-10 degrees. That small adjustment shifts weight back onto the sit bones and off sensitive tissue. That’s what makes tilt endearing to us instructors — such a tiny change with such a disproportionate result.
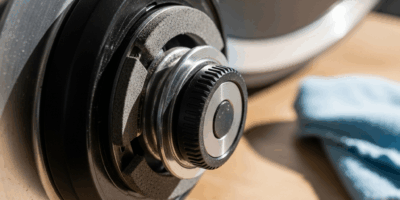
One rider, Jennifer, had stopped showing up entirely. Sit bones felt bruised by mid-week every week. We tilted her saddle down — barely noticeable with the naked eye, maybe 6 degrees. Three weeks later she pulled me aside before class and said it had changed everything. The tilt bolt lives underneath the saddle clamp. Ninety seconds to adjust on most bikes. Start small. One degree genuinely makes a difference.
When the Saddle Itself Is the Problem
Sometimes setup is dialed in perfectly and it still hurts. That’s different. That’s a saddle problem — and it’s less common than people assume, but it’s real.
Factory saddles are designed to fit the broadest possible range of bodies, which means they fit almost nobody particularly well. They’re firm, often narrower than your actual sit bone width, and typically shaped around men’s pelvic anatomy. That’s just manufacturing reality.
While you won’t need a complete bike overhaul, you will need a handful of affordable options to work through. First, you should try a gel seat cover — at least if you want a fast, cheap fix while your body adapts. They run $15-40 on Amazon. Not elegant. They slide occasionally. But they add cushioning immediately, and I keep two in my office for guests.
If seat pain persists beyond four weeks of corrected setup, the saddle itself needs replacing. Replacement saddles might be the best option, as indoor cycling requires a specific contact point your original saddle may simply not accommodate. That is because factory saddles prioritize manufacturing cost over anatomical fit — and that gap shows up directly in your sit bones.
I’m apparently someone who spent $300 learning this the expensive way, and buying based on price never worked for me while researching sit bone width always does. Your choice depends on pelvic anatomy and riding style. Some riders do well on gel saddles. Others prefer memory foam or firmer options that reduce inner-thigh chafing from excess width.
Popular upgrades worth considering: the Velo Plush and Velo Cloud saddles run around $70 and genuinely fit most people. The ISM Adonis costs roughly $120 but handles different pelvic angles well — useful if standard saddles consistently create pressure problems. The Selle Italia SLR and Fizik Arione are solid options too, though more road-oriented. Installation takes about two minutes. Most spin bikes use standard rail systems, and your replacement saddle attaches with the same hardware as the original.
Your Sit Bones Need Time to Adapt
As someone who has watched hundreds of riders quit in week two and then regret it later, I learned everything there is to know about the adaptation curve. Today, I will share the honest version — not the encouraging but vague version you usually hear.
Your sit bones have never been asked to support you from this specific angle, at this specific pressure point, for this duration. Even if you ride outdoors regularly, the position is different. The pressure distribution is different. The first two weeks will produce discomfort regardless of how good your setup is. Not sharp pain — sharp pain signals a problem. Just tenderness. A low-grade soreness that feels like your body registering something new. Because it is.
Padded shorts genuinely help during this window. Not for comfort during class — for recovery between rides. The padding reduces constant pressure irritation on tissue that’s still toughening up. Chamois cream, the medicated kind, also prevents chafing that compounds everything else. I’ve ridden in padded shorts for seven years. Still do.
Two weeks in, the skin adapts. The underlying tissue toughens. The tenderness mostly disappears. I can actually track this in my studio attendance data — riders who hit week three almost always stick around. The ones who quit in week two almost never come back.
The part nobody mentions: frequency matters more than duration. Riding once weekly means your body fully resets between sessions and soreness never actually improves. Ride three times in your first week — even just 20-minute sessions — and adaptation happens faster. Consistent stimulus teaches your body to adjust. Spaced-out rides just restart the process repeatedly.
One student, Raymond — quit after two classes because of soreness. I convinced him to come back two days later, before the discomfort had fully faded. He rode three times that week instead of spacing them out across ten days. By week two, the pain was mostly gone. He’s been riding twice weekly for two years. Don’t make his original mistake.
The sharp stuff is different. Shooting pain radiating down your legs — not normal. Numbness spreading through your perineum — not normal. Those signal a setup issue that needs diagnosing, usually height or fore-aft position again. General sit bone tenderness across the first fourteen days? Expected. You’re using your body differently. Give it the two weeks it’s asking for.
The whole conversation around spin bike seat pain usually runs backward. Riders assume they’re built wrong for cycling. That their body is the variable. The truth is almost always simpler: they need a two-inch seat adjustment and two weeks of patience. That’s the fix. That’s been the fix the whole time.

Leave a Reply