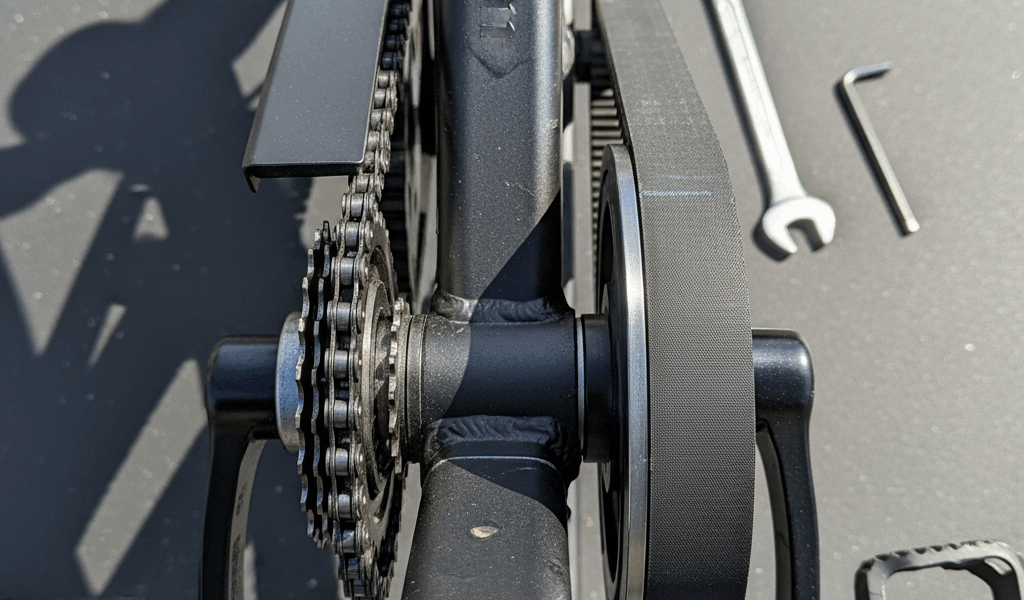
If a spin-bike chain slips, jumps, or falls off, stop riding until you know which drivetrain the bike has and what actually moved. A heavy fixed flywheel can keep the pedals turning after your feet stop, and an exposed drivetrain creates pinch points. Let the pedals and flywheel stop completely, apply the emergency brake if the manual calls for it, unplug bikes that use electrical power, and keep hands away from moving parts.
Do not start by tightening an axle or buying a chain. Many indoor cycles use a belt, not a chain, and “slipping” can also come from a loose pedal, crank, resistance mechanism, freewheel mechanism, or damaged drivetrain component. The model number and owner’s manual determine the correct inspection, tension specification, tools, and service procedure.
First, confirm whether the bike has a chain or belt
Find the brand and exact model number on the frame label, then check the manufacturer’s specifications or manual. Do not infer the drivetrain from how the bike sounds. Current indoor cycles may use a chain, toothed belt, Poly-V belt, or a model-specific arrangement hidden behind a guard.
- Chain drive: metal links run on toothed sprockets. Some chain noise is normal, but jumping, derailment, severe binding, or a sudden loss of drive is not.
- Belt drive: a rubber or composite belt runs on pulleys. Chain lubrication and chain-tension instructions do not apply.
- Unknown drive: leave the guard installed and look up the model. Contact the manufacturer if its documentation does not clearly identify the drive.
This distinction matters. The Keiser M3i, for example, uses a self-tensioning Poly-V belt that Keiser describes as requiring no adjustment. Sunny Health & Fitness also identifies the SF-B1805 as a magnetic belt-drive model. Neither should receive chain-adjustment instructions.
Is the chain actually slipping?
Describe the symptom before disassembly. “Slipping” can mean several different things:
- The pedals move but drive to the flywheel briefly disappears: possible chain engagement, sprocket, crank, or drivetrain problem.
- The chain visibly leaves a sprocket: possible excessive slack, misalignment, damaged teeth, damaged chain, or loose/moved drivetrain hardware.
- A click occurs once per pedal revolution: often points toward a pedal, crank, chainring, or a repeatable chain/sprocket location rather than generic “chain stretch.”
- The pedal or crank moves independently: stop riding; the pedal threads, crank interface, or another drive component may be loose or damaged.
- The resistance changes or feels as though it slips: the resistance mechanism may be involved even when the drive remains engaged.
- There is only steady metal-on-metal sound: a chain drive is not silent. Noise alone is different from a chain jumping or losing engagement.
Do not test a suspected fault with a standing sprint or high resistance. A sudden loss of pedal resistance can cause a fall or joint injury.
Safe checks before removing a drive guard
- Stop and secure the bike. Wait until the flywheel and pedals are motionless. Disconnect power where applicable and prevent anyone else from using it.
- Record the model and symptom. Note whether the issue happens once per revolution, only under load, after moving the bike, or after previous service.
- Inspect from outside. Look for a loose or crooked pedal, crank movement, damaged guard, missing fastener, metal debris, rust residue, or evidence that the flywheel has shifted. Do not place fingers through openings.
- Check user-adjustable parts. Confirm the seat and handlebar adjustments are locked and the bike sits level. A rocking frame can be mistaken for drivetrain movement.
- Read the model-specific maintenance section. Determine whether the manufacturer authorizes guard removal or tension adjustment by the owner and whether warranty service is required.
Horizon’s indoor-cycle manual warns that a fixed flywheel keeps the pedals moving until the flywheel stops and tells users not to dismount until both have completely stopped. Treat that as the baseline hazard whenever you work around an indoor cycle, even if your model’s controls differ.
Common causes on a true chain-drive spin bike
Incorrect chain tension
Too much slack can let a chain climb or leave a sprocket. Excessive tension can create noise, drag, bearing load, and accelerated wear. The correct deflection and measurement method are model-specific.
Sunny’s official chain-noise guide uses about one-half inch of deflection for the models covered by that procedure and instructs technicians to adjust both alignment sides equally when changing tension. That is useful manufacturer guidance, but it is not a universal specification for every indoor cycle. Use your bike’s manual or the manufacturer’s support instructions.
Flywheel or sprocket misalignment
A chain can run toward one edge of a sprocket when the flywheel axle or tension adjusters are uneven. Misalignment may also follow transport or previous service. Tightening only one side can make alignment worse.
Look for chain rub marks or a chain that does not track near the center of both sprockets, but do not run the bike with the guard removed unless the manufacturer’s service procedure explicitly requires it and you are qualified to follow that procedure.
Damaged chain or stiff link
Corrosion, a bent plate, damaged roller, loose pin, or stiff link can prevent smooth engagement. Do not run fingers along a chain while any part can move. A damaged chain should be matched to the exact model or to the manufacturer’s stated pitch, width, and length; “single-speed” or “one-eighth-inch” is not enough information for every machine.
Worn or damaged sprocket teeth
Broken, hooked, or visibly deformed teeth can make a chain climb or skip under load. Replacing only the chain may not solve a worn sprocket system. Ask the manufacturer whether the chain and sprockets should be assessed or replaced together.
Loose crank, chainring, axle, or hardware
A loose component can mimic chain slip and can damage mating surfaces if the bike remains in use. Fastener size, thread direction, torque, thread-locking requirements, and replacement rules vary. “Snug” is not a service specification; use the exact manual or qualified service.
Contamination or poor lubrication
Sweat and humidity can corrode a chain. Old lubricant can also collect debris. Use only the cleaner and lubricant the manufacturer approves. Sunny’s general maintenance guide distinguishes chain-drive lubrication from belt-drive care and specifically says belt bikes should skip its chain-lubrication step.
What not to do
- Do not assume a Schwinn, Peloton, Sunny, Keiser, or other model uses a chain based on the brand alone.
- Do not use a universal axle-nut size, deflection measurement, chain width, or torque value.
- Do not move the flywheel or pedals while fingers, clothing, hair, or tools are near the drivetrain.
- Do not test the repair at high cadence, high resistance, or while standing.
- Do not lubricate a belt or braking surface unless the exact manual instructs you to do so.
- Do not install a generic replacement chain without matching the manufacturer’s specification.
- Do not keep riding after a chain derailment, damaged guard, loose crank, or recurring loss of drive.
When an owner adjustment is reasonable
An adjustment is reasonable only when the manufacturer provides a procedure for the exact model, the required parts are intact, you have the specified tools, and the work does not conflict with warranty or service restrictions. Follow the manual’s order for loosening, alignment, tension, tightening, and guard replacement.
Afterward, rotate the drive slowly by hand only as the manual permits, keeping clear of pinch points. Confirm that the chain tracks consistently and the guard is fully reinstalled. Begin any operational test seated, at low resistance and low cadence. Stop immediately if the chain climbs, catches, rubs, or loses engagement.
When to contact the manufacturer or a technician
Stop and request service when the chain has come off, a guard is damaged, the flywheel or crank has side-to-side play, a fastener will not hold, metal is cracked, sprocket teeth are damaged, the chain repeatedly jumps, or the correct tension/alignment procedure is unavailable. Commercial gym equipment should be tagged out and handled under the facility’s maintenance process.
Provide the model and serial number, photographs taken with the machine stopped, a description of when the slip occurs, and details of any recent transport or service. That gives support staff more useful information than an assumed chain size or a generic “half-inch” adjustment.
If the symptom is a click rather than loss of drive, use the spin-bike clicking-noise guide. For sound or vibration centered at the flywheel, follow the flywheel clicking and grinding diagnostic. If the pedal itself loosens, see the pedal-loosening checks.
Frequently asked questions
Why does my spin-bike chain keep slipping off?
On a confirmed chain-drive model, possible causes include incorrect tension, flywheel or sprocket misalignment, a damaged or stiff chain, worn teeth, or loose drive hardware. First verify the exact model and follow its manufacturer’s procedure.
How tight should a spin-bike chain be?
Use the specification for the exact model. Some Sunny chain-drive support instructions use about one-half inch of deflection, but that value should not be applied automatically to other brands or models.
Can I ride after putting the chain back on?
Not until the cause of the derailment has been found, tension and alignment have been checked to the manufacturer’s specification, damaged components have been ruled out, and the guard has been reinstalled. A chain usually does not leave the sprockets without an underlying issue.
Does a Peloton, Schwinn IC4, or Keiser M3i use a chain?
Do not rely on a generic brand list because models change. Verify the exact model’s specifications. Keiser identifies the M3i as a Poly-V belt-drive bike, and the chain procedure in this guide does not apply to it.
Should I replace the chain or adjust it?
Adjustment may address verified slack or alignment on a serviceable chain-drive model. Visible damage, stiff links, corrosion, recurring derailment, or worn sprockets may require parts and professional assessment. Match replacements to the manufacturer’s specification.
Official maintenance references
- Sunny Health & Fitness: chain noise and tension troubleshooting
- Sunny Health & Fitness: indoor exercise-bike maintenance
- Horizon Fitness: indoor-cycle care and maintenance
- Keiser: M Series manuals and support
Bottom line: identify the drivetrain before touching it. On a true chain-drive bike, chain slip is a symptom to diagnose—not a reason to apply a universal axle adjustment. Use the exact model’s service instructions, keep clear of the fixed flywheel and drivetrain, and stop riding until recurring slip or derailment is resolved.

Leave a Reply