Why Your Cleat Keeps Releasing Mid-Ride
Spin bike cleat issues have gotten complicated with all the conflicting advice flying around. Your cleat pops out mid-sprint, you assume the shoe is trashed, and you’re already browsing replacements online. I’ve been there — three times, actually, across two different bikes and a pedal system switch I probably shouldn’t have attempted alone. Today, I will share everything I learned so you don’t spend money guessing.
But what is a cleat release problem, really? In essence, it’s a mismatch between your cleat and pedal’s engagement. But it’s much more than that — there are four distinct failure points, and most riders tunnel-vision on the shoes when the actual culprit is somewhere else entirely. So, without further ado, let’s dive in.
Check the Cleat for Wear Before Anything Else
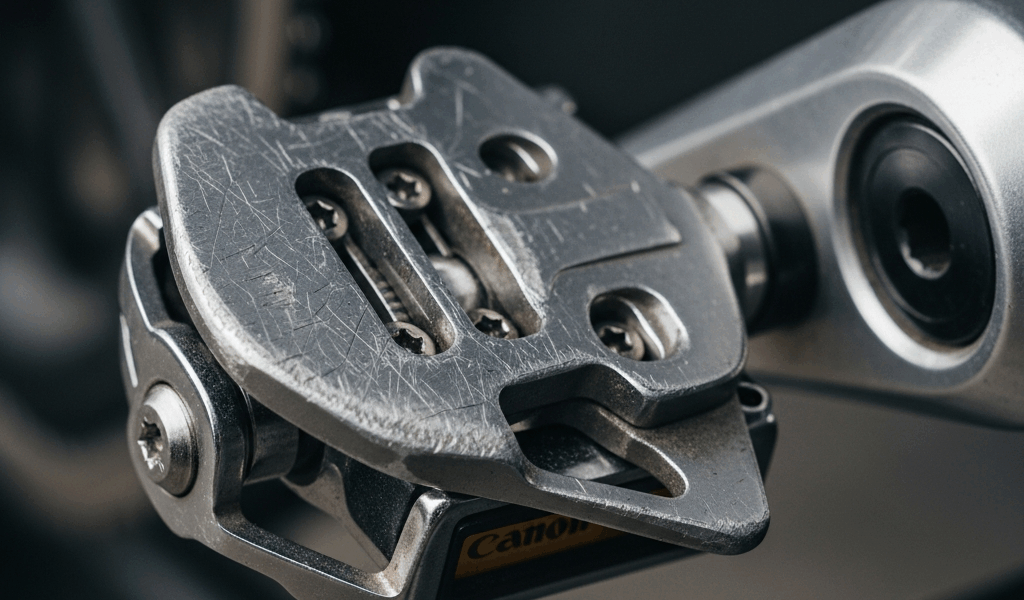
Start here. Worn cleats cause early release more than anything else combined. I learned this after riding the same pair of Shimano cleats for nearly two years — SM-SH51s, the single-release version — wondering why I kept popping out during the last 20 minutes of hard sessions. Turned out the teeth were basically smooth plastic at that point.
Grab a bright light and flip your shoe over. Look at those small gripping edges that lock into the pedal body. Sharp means good. Rounded or cracked means you found your problem. Most quality cleats have a wear indicator line molded directly into the underside — a small groove or color marker that disappears as the tread goes. When that line’s gone, so is your retention.
Replacing cleats runs under $20 and takes maybe five minutes. The catch is buying the right type for your specific pedal. Don’t make my mistake of grabbing whatever had the best reviews.
Cleat compatibility for common spin bikes
- Peloton bikes use Delta cleats — three-bolt, wider platform. If you’re on a Peloton, you need Delta-compatible shoes and Delta replacement cleats specifically.
- Most other spin bikes — Flywheel, Stages, most boutique studio brands — use SPD cleats. Two-bolt system. By far the most common format you’ll encounter.
- Some premium bikes run Look Delta or road-style cleats, which are an entirely different animal and honestly annoying to source locally.
Check your bike’s manual or just look at the pedal. Flat cage with a visible spring mechanism on the sides? Probably SPD. Peloton pedals look bulkier and more enclosed — you’ll know when you see them side by side.
Mixing cleat brands with mismatched pedals creates the exact slipping symptom you’re experiencing, by the way. I’m apparently someone who learned this the hard way — Shimano cleats work for me while off-brand “SPD compatible” versions never hold properly. The geometry is just slightly different enough to cause problems. Stick with the manufacturer-specified cleat type.
How to Adjust the Pedal Release Tension
Cleats look fine — sharp teeth, no visible cracks, wear indicator still present? Then the tension screw is almost certainly your problem. Every clipless pedal has one. It controls how much lateral force you need to twist out. Too loose, you pop free mid-sprint. Too tight, you’re stuck on the bike when you need to get off fast.
Locate the tension adjustment screw on your pedal body. On SPD pedals, it’s a small screw on the side, usually marked with + and – symbols — sometimes recessed enough that you need a 3mm hex key to reach it. On Look-style pedals, it’s typically a colored dial on the heel end, red or orange, that you turn by hand.
The adjustment process
- Start loose. Turn the screw one quarter turn counterclockwise on SPD pedals to reduce retention.
- Clip both shoes in while sitting on the bike.
- Twist your heel outward using your normal unclipping motion.
- Released too easily? One quarter turn clockwise and try again.
- Keep going until you stay clipped during hard efforts but can still exit cleanly with a deliberate heel twist.
Most riders land between 2 and 4 clicks on whatever tension dial their pedals use. I run 3 clicks personally — smaller feet, and I needed slightly more retention to feel secure during standing climbs. Your number depends on leg strength, foot size, and how worn your cleats already are.
Maxing out the tension is a trap, though. End of a hard class, hip flexors tight, legs cooked — that high-tension pedal becomes a real liability. Forcing out violently and rolling your ankle is a bad afternoon. Retention should feel confident. Not desperate.
A practical test off the bike
Before your next hard session, do this. Sit on the bike with both feet clipped in. Without pedaling, try to twist each heel outward using your normal unclipping motion. You should feel clear resistance — but one smooth movement should get you out. No violent jerking. No bracing against the handlebars.
Pedals with no tension screw at all? That’s a different situation. Some budget spin bikes ship with fixed-retention pedals that genuinely cannot be tuned. Shimano SPD pedals — the PD-M520s run about $55–65 a pair — are worth the upgrade for the adjustability alone. That was a purchase I should have made about six months earlier than I did, honestly.
Fix Cleat Alignment If Tension Wasn’t the Problem
Probably should have opened with this section, honestly — misaligned cleats are mechanical and precise, which makes this feel harder than it is.
Your foot has a natural resting angle. If your cleat is mounted too far inward or outward from that angle, your foot will gradually rotate out of the pedal’s engagement zone during hard efforts. You don’t consciously feel it happening. Your body just drifts, and suddenly you’re not clipped in anymore. That’s what makes cleat alignment so frustrating — it looks fine until it isn’t.
Simple positioning rule: let your foot hang relaxed, as if you’re standing normally on flat ground. Your cleat should mirror that angle. Practically speaking, position the cleat so there’s roughly one to two finger widths of space between your big toe and the cleat’s inner edge. Foot anatomy varies enough that this isn’t perfect for everyone, but it’s a reliable starting point for most riders.
The re-mounting process
While you won’t need a full bike fit session, you will need a handful of basic tools — a 2mm or 3mm hex wrench and ideally a torque wrench set to 5–6 Nm. A regular wrench with careful hand pressure works in a pinch, but the torque wrench prevents stripping the bolt heads.
- Loosen the cleat bolts — usually two bolts, sometimes three depending on your shoe system.
- Shift the cleat to your target position using the finger-width rule above.
- Hand-tighten until snug but still adjustable under pressure.
- Test ride for 5–10 minutes at moderate effort, paying attention to whether your foot stays naturally centered in the pedal.
- Micro-adjust as needed, then retighten.
- Final torque: 5–6 Nm. Or firm, deliberate pressure with your hex wrench if you don’t have a torque tool.
Do both shoes. I’ve personally watched riders fix one side, then spend two more weeks baffled about why the other foot still releases early. Both sides, every time.
When to Replace the Pedals Entirely
Frustrated by a cleat that keeps releasing even after addressing wear, tension, and alignment, most riders eventually accept that the pedal mechanism itself is damaged. This new diagnosis tends to arrive several sessions later than it should, usually after replacing cleats twice unnecessarily.
Look for these specific signs: a visibly broken or cracked spring inside the pedal body, side-to-side play in the pedal cage when you wiggle it by hand, or a tension adjustment screw that spins freely with zero resistance — meaning the internal threading is stripped and the screw is doing nothing.
That pedal is done. Replace both as a matched pair — mismatched pedal feel between feet creates its own problems. Shimano SPD pedals run $60–90 per pair depending on the model and handle years of heavy use. PD-M520s or PD-M540s are the workhorses here. Compatible with essentially every spin bike running the two-bolt standard.
This failure is more common on studio bikes than people realize — heavy daily use accelerates spring fatigue significantly. It’s not a sign the whole bike is failing. Just wear and tear on a component that was always meant to be replaced eventually. That’s what makes cycling consumables endearing to us riders — cheap to fix when you know what you’re actually fixing.

Leave a Reply