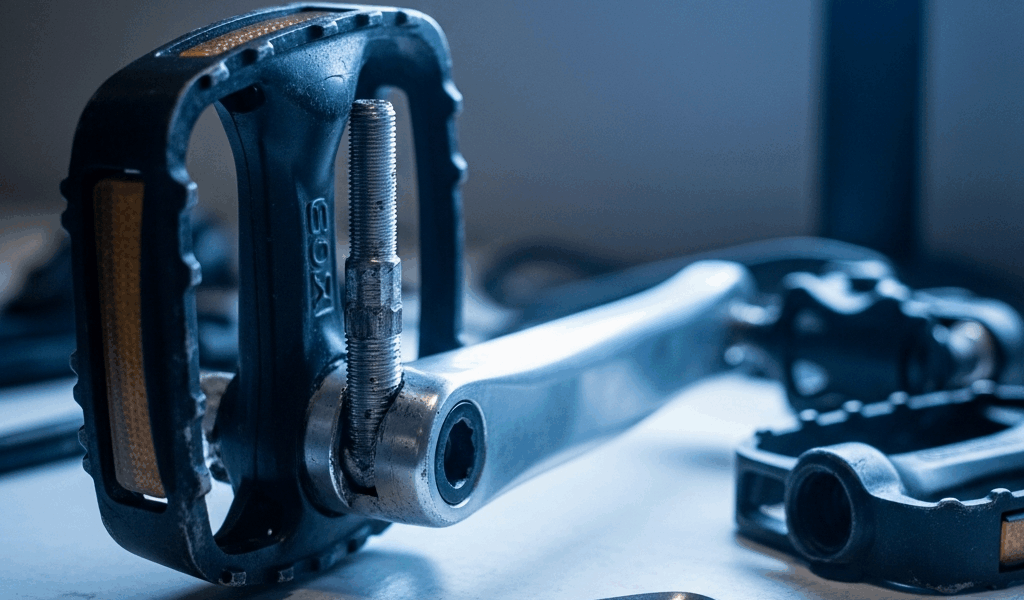
Why Spin Bike Pedals Strip in the First Place
Spin bike maintenance has gotten complicated with all the conflicting advice flying around. As someone who has spent years troubleshooting Peloton and NordicTrack bikes in my own garage, I learned everything there is to know about stripped pedal threads the hard way. Today, I will share it all with you.
But what causes stripping in the first place? In essence, it comes down to three specific failures. But it’s much more than just “you overtightened it” — each cause damages the bike differently and points toward a different fix.
Cross-threading during installation is the most common culprit. You angle the pedal spindle slightly wrong going in, the threads catch incorrectly, and you keep turning because nothing feels obviously wrong until it does. By then, the aluminum threads inside the crank arm are already gone. The pedal spindle itself — hardened steel — almost never strips. The crank arm, cast aluminum, absolutely does.
Overtightening is the second failure point. Most riders assume “tight” and “fully tightened” mean the same thing, so they lean their full upper body into the wrench. A spin bike pedal needs roughly 35 foot-pounds of torque. Most people apply closer to 70 without realizing it.
Third: the crank arm threads just wear out. After 3,000 or so rides, the aluminum fatigues and degrades. That one you can’t prevent — only manage when it happens.
How to Tell If the Thread Is Actually Stripped
Probably should have opened with this section, honestly. Correct diagnosis saves you from buying a $120 crank arm you don’t actually need.
Start by spinning the pedal by hand with the crank arm held stationary. Stripped threads feel unmistakable — the pedal rotates freely under light pressure with almost zero resistance, completing full turn after full turn without ever threading deeper. A pedal that simply needs tightening behaves completely differently. It gets noticeably harder to turn after half a rotation, then stops altogether. Those two sensations are nothing alike once you’ve felt both.
Next, do the wobble test under load. Sit on the bike, push your full weight down onto the pedal at the 3 o’clock position, and watch where the pedal meets the crank arm. Any side-to-side movement means either a loose pedal or stripped threads. Grab a 15mm pedal wrench and tighten it fully. If the wobble disappears and holds through three full pedal strokes, you had a loose pedal. Done — go ride.
If the wobble comes right back, or if the pedal keeps spinning freely under the wrench, the threads are genuinely damaged. Not maybe damaged. Damaged.
One last check: try hand-threading the pedal into the crank arm without any tools at all. Healthy threads pull in smoothly with steady, increasing resistance. Stripped threads feel mushy — almost no resistance, or they jam partway through. Stop immediately if jamming happens. Every extra turn makes the damage worse.
Fix It Step by Step Without Replacing the Crank Arm
You have three repair options. Here they are, ranked from least effort to most involved. So, without further ado, let’s dive in.
Option 1 — Re-tap the Existing Threads
This works when threads are only partially damaged. You’re essentially re-cutting them at the same original size, which cleans up light damage surprisingly well.
While you won’t need a full machine shop, you will need a handful of specific tools. Most spin bikes use 9/16-inch-20 TPI pedals — that’s 9/16-inch diameter, 20 threads per inch — so confirm that size before ordering anything. A quality pedal tap runs $18 to $35 on Amazon. You also need cutting fluid. Plain 3-in-1 oil from the hardware store works fine, or grab a small bottle of Tap Magic for around $12.
Remove the pedal completely first. Insert the tap into the crank arm hole and turn it clockwise slowly, pressing downward as you go. One full rotation forward, then a quarter-turn back to clear aluminum chips. Repeat that until the tap threads completely through and exits the back of the crank arm. Two minutes per side, maybe less.
Wipe out the chips with a dry paper towel. Hand-thread the pedal back in. If it seats with steady resistance and tightens down smoothly, you’re done — those threads are functionally new again.
Option 2 — Install a Thread Repair Insert (HeliCoil Method)
This is what I ended up doing on my second spin bike after re-tapping didn’t hold the first time. Frustrating experience, but it pointed me toward the right solution. HeliCoil inserts are small coiled stainless steel sleeves that drop into a re-drilled hole and create a fresh set of threads from scratch.
You drill the damaged hole out slightly larger — usually 19/32-inch for a 9/16-inch pedal, though your specific HeliCoil kit will confirm the exact bit size. Then you tap new threads sized for the insert itself, screw in the HeliCoil with the included installation tool, and suddenly you have brand-new threads in a brand-new material. The pedal screws into the steel insert, not bare aluminum.
A HeliCoil kit for 9/16-inch pedals costs around $20 and typically includes the drill bit, tap, insertion tool, and six to ten inserts. The whole repair takes 10 to 15 minutes. I’m apparently hard on crank arms — I’ve used HeliCoil inserts on two different bikes now — and neither insert has ever stripped a second time. Don’t make my mistake of trying re-tapping twice before jumping to this step.
Option 3 — Thread-Locking Compound (Temporary Fix)
Thread-locking compound might be the best option for minimally damaged threads, as this repair requires almost no tools. That is because the compound fills microscopic gaps and hardens in place, preventing the pedal from working loose through vibration and micro-movement during rides.
Apply medium-strength Loctite 243 — the blue bottle, not red — to the pedal spindle threads before installing. Red Loctite 271 is permanent and will create its own nightmare later. Blue is the right call here.
This isn’t a cure for genuinely stripped threads. It’s a bandage. I’ve used it on rental bikes and community gym equipment where a full repair wasn’t practical. Pedal stays tight for months under that scenario, but the underlying damage is still there.
One critical detail regardless of which repair you choose: the left pedal on nearly every spin bike has reverse threads. It tightens counter-clockwise, loosens clockwise — the opposite of everything else. Installing it normally strips the threads in seconds. Check your bike’s manual or look for the stamped “L” marking on the left pedal spindle before touching it with a wrench. That’s what makes this particular detail so important to us cyclists — it’s completely counterintuitive and easy to forget under a time crunch.
When You Need to Replace the Crank Arm Instead
Repair stops making sense in three situations. Visible cracking around the thread bore means replacement — aluminum with stress cracks will fail again under load regardless of how clean your HeliCoil installation was. Severe damage where you can essentially wiggle a finger into the hole without resistance means there’s nothing left for any insert or tap to grab. And if you’ve attempted two repairs already and the pedal keeps stripping, the crank arm is telling you something.
First, you should confirm your exact bike model number — at least if you want to order the correct replacement part. A NordicTrack S22i crank arm won’t fit a Peloton Bike+, and generic replacement arms are largely useless for branded spin bikes. Replacement crank arms run $85 to $150 depending on brand. Installation requires a crank puller tool, which costs around $15 to $20 at any bike shop. Alternatively, bring the whole bike in and pay $30 to $50 for labor — reasonable if you don’t want another tool cluttering the garage.
How to Stop It Happening Again
Always hand-thread the pedal completely before picking up a wrench. Feel the threads engage and seat. Any roughness or resistance during hand-threading means something is wrong — back it out and start over rather than powering through it.
Use a torque wrench set to exactly 35 foot-pounds. A decent digital torque wrench from Tekton runs around $25 on Amazon and will outlast your spin bike by a decade. That number removes all guesswork from the equation.
Apply a thin coat of anti-seize compound to the pedal threads before every installation. It prevents the steel spindle from cold-welding to the aluminum crank arm over months of heat and vibration cycles — which means the next time you need to remove the pedal, it actually comes out without a fight.
The wobble is gone. The pedal is tight. You didn’t buy a crank arm you didn’t need.

Leave a Reply